
1.引言
Spring Boot 入门级教程,本章节我们将要学习如何使用验证码进行登录,现在使用验证码登录方式是再常见不过了,图形验证码,手机短信,邮箱验证码啊诸如此类的。今天我们以图形验证码为例,介绍下如何在Spring Boot中 使用 Spring Security添加验证码。与之前文章不同的是,这篇文章也将与数据库结合,模拟真实的开发环境。

2.准备工作
1.首先使用spring boot starter jpa 帮助我们通过实体类在数据库中简历对应的表结构,以及插入用户一条数据。
这里主要包含用户的账户、密码等信息,可以查看之前的文章,这里不再赘述。
精通SpringBoot: Spring Security 自定义认证流程
3.配置UserDetails, UserDeatilsService
在前面两篇文章中都有详细介绍过如何配置UserDetails以及UserDetailsService,这里也就不在赘述了
4.生成随机验证码
在生成验证码的同时,将验证码放入session中。
/**
 * @author developlee
 * @since 2019/1/14 16:23
 */
@RestController
public class CaptchaController {

    /**
     * 用于生成验证码图片
     *
     * @param request
     * @param response
     */
    @GetMapping("/code/image")
    public void createCode(HttpServletRequest request, HttpServletResponse response) throws Exception {
        HttpSession httpSession = request.getSession();
        Object[] objects = ValidateUtil.createImage();
        httpSession.setAttribute("imageCode", objects[0]);
        BufferedImage bufferedImage = (BufferedImage) objects[1];
        response.setContentType("image/png");
        OutputStream os = response.getOutputStream();
        ImageIO.write(bufferedImage, "png", os);
    }
}
工具类的实现,这个网上有很多种,大家可以搜一下看看
/**
 * @author developlee
 * @since 2019/1/18 17:24
 */
public class ValidateUtil {
    // 验证码字符集
    private static final char[] chars = {
            '0', '1', '2', '3', '4', '5', '6', '7', '8', '9',
            'a', 'b', 'c', 'd', 'e', 'f', 'g', 'h', 'i', 'j', 'k', 'l', 'm', 'n',
            'o', 'p', 'q', 'r', 's', 't', 'u', 'v', 'w', 'x', 'y', 'z',
            'A', 'B', 'C', 'D', 'E', 'F', 'G', 'H', 'I', 'J', 'K', 'L', 'M', 'N',
            'O', 'P', 'Q', 'R', 'S', 'T', 'U', 'V', 'W', 'X', 'Y', 'Z'};
    // 字符数量
    private static final int SIZE = 4;
    // 干扰线数量
    private static final int LINES = 5;
    // 宽度
    private static final int WIDTH = 80;
    // 高度
    private static final int HEIGHT = 40;
    // 字体大小
    private static final int FONT_SIZE = 30;

    /**
     * 生成随机验证码及图片
     * Object[0]:验证码字符串;
     * Object[1]:验证码图片。
     */
    public static Object[] createImage() {
        StringBuffer sb = new StringBuffer();
        // 1.创建空白图片
        BufferedImage image = new BufferedImage(
                WIDTH, HEIGHT, BufferedImage.TYPE_INT_RGB);
        // 2.获取图片画笔
        Graphics graphic = image.getGraphics();
        // 3.设置画笔颜色
        graphic.setColor(Color.LIGHT_GRAY);
        // 4.绘制矩形背景
        graphic.fillRect(0, 0, WIDTH, HEIGHT);
        // 5.画随机字符
        Random ran = new Random();
        for (int i = 0; i <SIZE; i++) {
            // 取随机字符索引
            int n = ran.nextInt(chars.length);
            // 设置随机颜色
            graphic.setColor(getRandomColor());
            // 设置字体大小
            graphic.setFont(new Font(
                    null, Font.BOLD + Font.ITALIC, FONT_SIZE));
            // 画字符
            graphic.drawString(
                    chars[n] + "", i * WIDTH / SIZE, HEIGHT*2/3);
            // 记录字符
            sb.append(chars[n]);
        }
        // 6.画干扰线
        for (int i = 0; i < LINES; i++) {
            // 设置随机颜色
            graphic.setColor(getRandomColor());
            // 随机画线
            graphic.drawLine(ran.nextInt(WIDTH), ran.nextInt(HEIGHT),
                    ran.nextInt(WIDTH), ran.nextInt(HEIGHT));
        }
        // 7.返回验证码和图片
        return new Object[]{sb.toString(), image};
    }

    /**
     * 随机取色
     */
    public static Color getRandomColor() {
        Random ran = new Random();
        Color color = new Color(ran.nextInt(256),
                ran.nextInt(256), ran.nextInt(256));
        return color;
    }
}
配置好之后,在页面加上我们的验证码
 <input name="validateCode" type="text" placeholder="请输入验证码">
 <input type=image src="http://localhost:8080/code/image"/>
5.配置过滤器链
然后我们写一个filter拦截器,用来实现验证码的验证。
/**
 * @author developlee
 * @since 2019/1/14 16:42
 */
@Slf4j
public class CaptchaFilter extends OncePerRequestFilter {

    @Autowired
    private AppConfig appConfig;

    private AuthenticationFailureHandler authenticationFailureHandler;

    // 注入appConfig
    public CaptchaFilter (AppConfig appConfig, AuthenticationFailureHandler authenticationFailureHandler) {
        this.appConfig = appConfig;
        this.authenticationFailureHandler = authenticationFailureHandler;
    }

    @Override
    protected void doFilterInternal(HttpServletRequest httpServletRequest, HttpServletResponse httpServletResponse, FilterChain filterChain) throws ServletException, IOException {
        if(httpServletRequest.getRequestURI().equals(appConfig.getLoginUri().trim()) && httpServletRequest.getMethod().equals(RequestMethod.POST.name())) {
           try {
               validateCode(httpServletRequest);
           } catch (ValidateException e) {
               authenticationFailureHandler.onAuthenticationFailure(httpServletRequest, httpServletResponse, e);
               return;
           }
        }
        filterChain.doFilter(httpServletRequest, httpServletResponse);
    }

    /**
     * 验证码的认证
     * @param userValidateCode
     * @throws ValidateException
     */
    private void validateCode(HttpServletRequest httpServletRequest) throws ValidateException {
        // 如果是登录请求,并且是post方式访问,则校验验证码
        String userValidateCode = httpServletRequest.getParameter("validateCode");
        String sysValidateCode = (String) httpServletRequest.getSession().getAttribute("imageCode");
        log.info("用户输入的验证码是:{},系统保存的验证码是:{}", userValidateCode, sysValidateCode);
        // 和我们保存的验证码进行比较
        if(StringUtils.isEmpty(userValidateCode)) {
            throw new ValidateException("验证码信息不能为空");
        }
        if(!StringUtils.equalsIgnoreCase(userValidateCode, sysValidateCode)) {
            throw new ValidateException("验证码不正确");
        }
        // TODO 可加上对验证码有效时间的验证,有兴趣的话可以自己实现下。其实就在生成验证码时,记录下生成的时间戳就好了。
    }
}
这个类中定义了一个ValidateException,这个exception扩展了Spring Security 中的 AuthentionException,当抛出ValidateException,确保我们的异常能被Spring Security正常捕获。
public class ValidateException extends AuthenticationException {
    @Getter
    @Setter
    private String code;

    @Getter
    @Setter
    private String msg;

    @Getter
    @Setter
    private Exception exception;

    public ValidateException(String msg) {
        super(msg);
    }

    public ValidateException(String msg, Throwable t) {
        super(msg, t);
    }
}
OK,到这里我们还缺最后一步,那就是将ValidateFilter添加到Spring Security 的拦截器链中,先看下过滤器链的执行顺序:
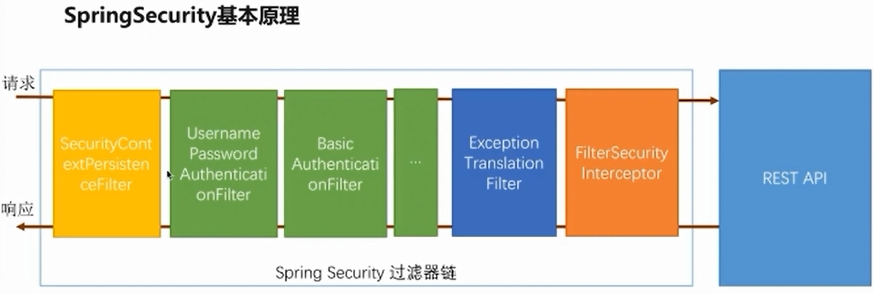
图片来源网络。
我们应该在验证用户名和密码之前先对验证码进行校验,因此我们的CaptchaFilter应该在UsernamePasswordAuthenticationFilter之前执行。
@Slf4j
@Configuration
@EnableWebSecurity
public class SecurityConfig extends WebSecurityConfigurerAdapter {

    @Autowired
    private UserDetailsServiceImpl userDetailsService;

    @Bean
    public PasswordEncoder passwordEncoder() {
        return new BCryptPasswordEncoder();
    }

    @Autowired
    private AppConfig appConfig;

    @Override
    protected void configure(HttpSecurity http) throws Exception {
        http.formLogin().loginPage("/sign_in").loginProcessingUrl(appConfig.getLoginUri())
                .defaultSuccessUrl("/welcome").permitAll()
                .failureHandler(new MyFailureHandler())
                .and().authorizeRequests().antMatchers("/code/image").permitAll()
                .and().addFilterBefore(new CaptchaFilter(appConfig, new MyFailureHandler()), UsernamePasswordAuthenticationFilter.class) // 验证码过滤器加入过滤器链
                .logout().logoutUrl("/auth/logout").clearAuthentication(true)
                .and().authorizeRequests().anyRequest().authenticated();
    }

    @Override
    protected void configure(AuthenticationManagerBuilder auth) throws Exception {
        auth.userDetailsService(userDetailsService).passwordEncoder(passwordEncoder());
    }
}
到这里之后,我们已经完成了对验证码的验证,然后要处理当验证不通过,也就是抛出ValidateException时,返回信息给页面。
注意到,SecurityConfig中的MyFailureHandler这个类,AuthentionException异常将会在这个类中处理。
/**
* 登录失败处理逻辑
*/
@Slf4j
public class MyFailureHandler implements AuthenticationFailureHandler {
@Override
public void onAuthenticationFailure(HttpServletRequest httpServletRequest, HttpServletResponse httpServletResponse, AuthenticationException e) throws IOException, ServletException {
if (e instanceof ValidateException) {
log.info("用户输入验证码错误,返回错误信息" + e.getMessage());
}
httpServletResponse.setHeader("content-type", "application/json");
httpServletResponse.setCharacterEncoding("UTF-8");
Writer writer = httpServletResponse.getWriter();
writer.write(e.getMessage());
}
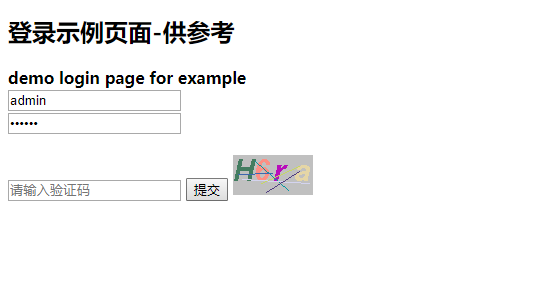
}到这编码部分基本就结束了。下面我们在页面做个测试
6.测试
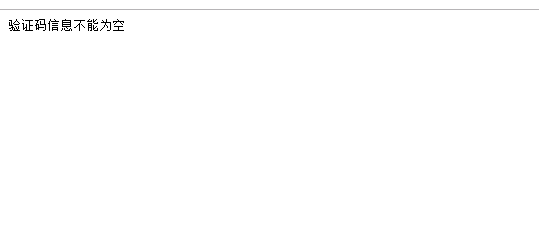
测试验证码为空的情况
看到log窗口打印的日志如下:提示返回验证信息不能为空

界面显示错误信息也是一样。
测试下验证码错误的情况

返回的是验证码不正确

这里的错误提示信息我们可以做个优化,让其在登录页面时就显示,可以自己实现下,在MyFailureHandler中用response.forward并携带错误信息跳转到登录页,然后在登录页面显示异常信息即可。
另外也可以看到,验证码不正确时,我们并没有对用户信息进行验证。所以SecurityConfig中的addFilterBefore是生效的。
7.总结
献上一句格言,来自马克·扎克伯格的座右铭: Stay foucsed, Keep shipping(保持专注,持续交付)
这篇文中,主要介绍了Spring Security整合验证码实现登录的功能。要注意的地方就是CaptchaFilter是扩展OncePerRequestFilter,然后要将该Filter放在Spring Security 的过滤器链中,并在UsernamePasswordAuthenticationFilter之前执行,以及异常的处理是使用自定义的FailureHandler。具体代码可参看我的github.com,欢迎大家star和follow,感谢观看。
[…] Spring Security是一个功能强大的安全框架,用于保护Spring应用程序中的资源。其中一个常见的功能是“记住我”,即在用户关闭浏览器后仍能保持登录状态。本教程将介绍如何配置和使用Spring Security实现“记住我”功能,帮助开发者构建更加安全可靠的Web应用程序。 本章的代码实现是在上一篇教程:精通Spring Boot: Spring Security 整合验证码登录基础上,如果感觉本篇跳跃幅度较大,可先阅读上一篇,或访问我的github.com(文末会附上地址),下载源码阅读。 […]